Its easy to find a getting started tutorials online but most of them miss out the final phase the deployment part so this will be a “how to guide” to deploy a react js app, will only cover deployment. I will be referring to react js application as react app or react application.
In here I’ll demonstrate two types of deployments, one on a static file hosting service (AWS S3) and second on a conventional server using a react project build on Create React App.
Before we begin I’ll brief on a few aspects of deployment being done
- Deployment will be done using CI/CD ( Gitlab Pipelines ) to AWS S3 and also conventional method where build is done on local system and transferred to a web host provide like Dreamhost.com, Godaddy etc.
- Includes a basic snapshot test using Jest to demonstrate integration with Continuous Integration.
- No server side Rendering
Note : This method is applicable for react JS app that works on API to connect to a backend service or if you are building a static react JS website. If you have integrated the react JS within your Rails, Django or any project you have to use different method to deploy depending on application.
How to get it done
Getting started materials are everywhere on the Internet and its easy to pick any one and get going because the subject knowledge at that point in time would be minimal or none. Once you are in final or deployment phase you would be looking for a perfect solution. So I would like to tell there are multiple ways to deploy a react js app this is one of many, feel free to change steps in CI/CD process as per your need.
In a nutshell you need to compile and convert the JSX to HTML & Javascript and get it to a server which can serve these files to users. But things won’t be that easy, since react applications perform functional tasks you are supposed to test the code for its proper functioning before compilation, create-react-app comes with Jest package for testing (refer jest docs to get started ) or you can use any other testing of your choice. I’ll be demonstrating with Jest.
Steps to deploy a react project :
- Test: Testing ensures all your components are working as you planed it to be.
- Build: The JSX you been playing with have to be converted to HTML and Javascript files, this process is know as build.
- Move to Server: Next part is straight forward you need to move the build files to a server.
Let’s move to deployment
Conventional Method
In here you would do the testing and build process locally on your machine and the generate files will be transferred to the server.
Test
npm test will get the jest suit running, jest only runs test for files that are changed since last commit to save time but you can run all test if you choose to.
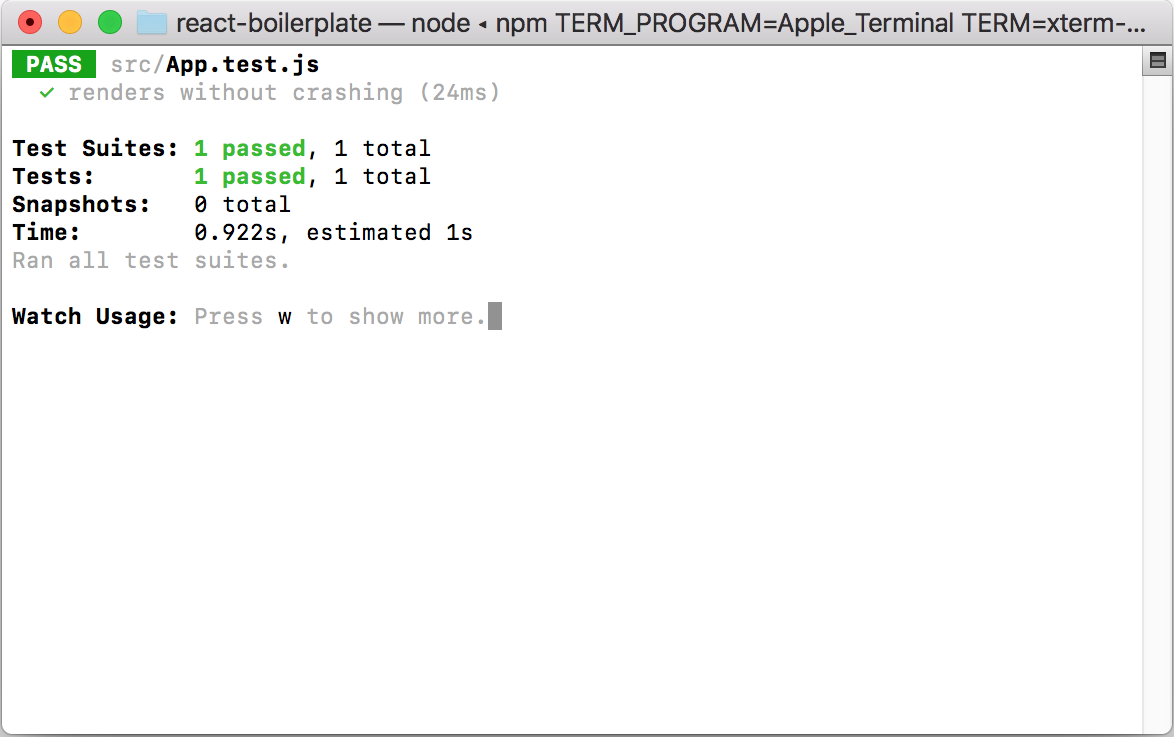
If you see all green you can moved ahead and build the package. I won’t mention testing as an optional step, its highly recommended you do testing in all your application.
Build
Execute npm run build in the application directory and you will get the project compiled and build into bunch of web documents in build directory.
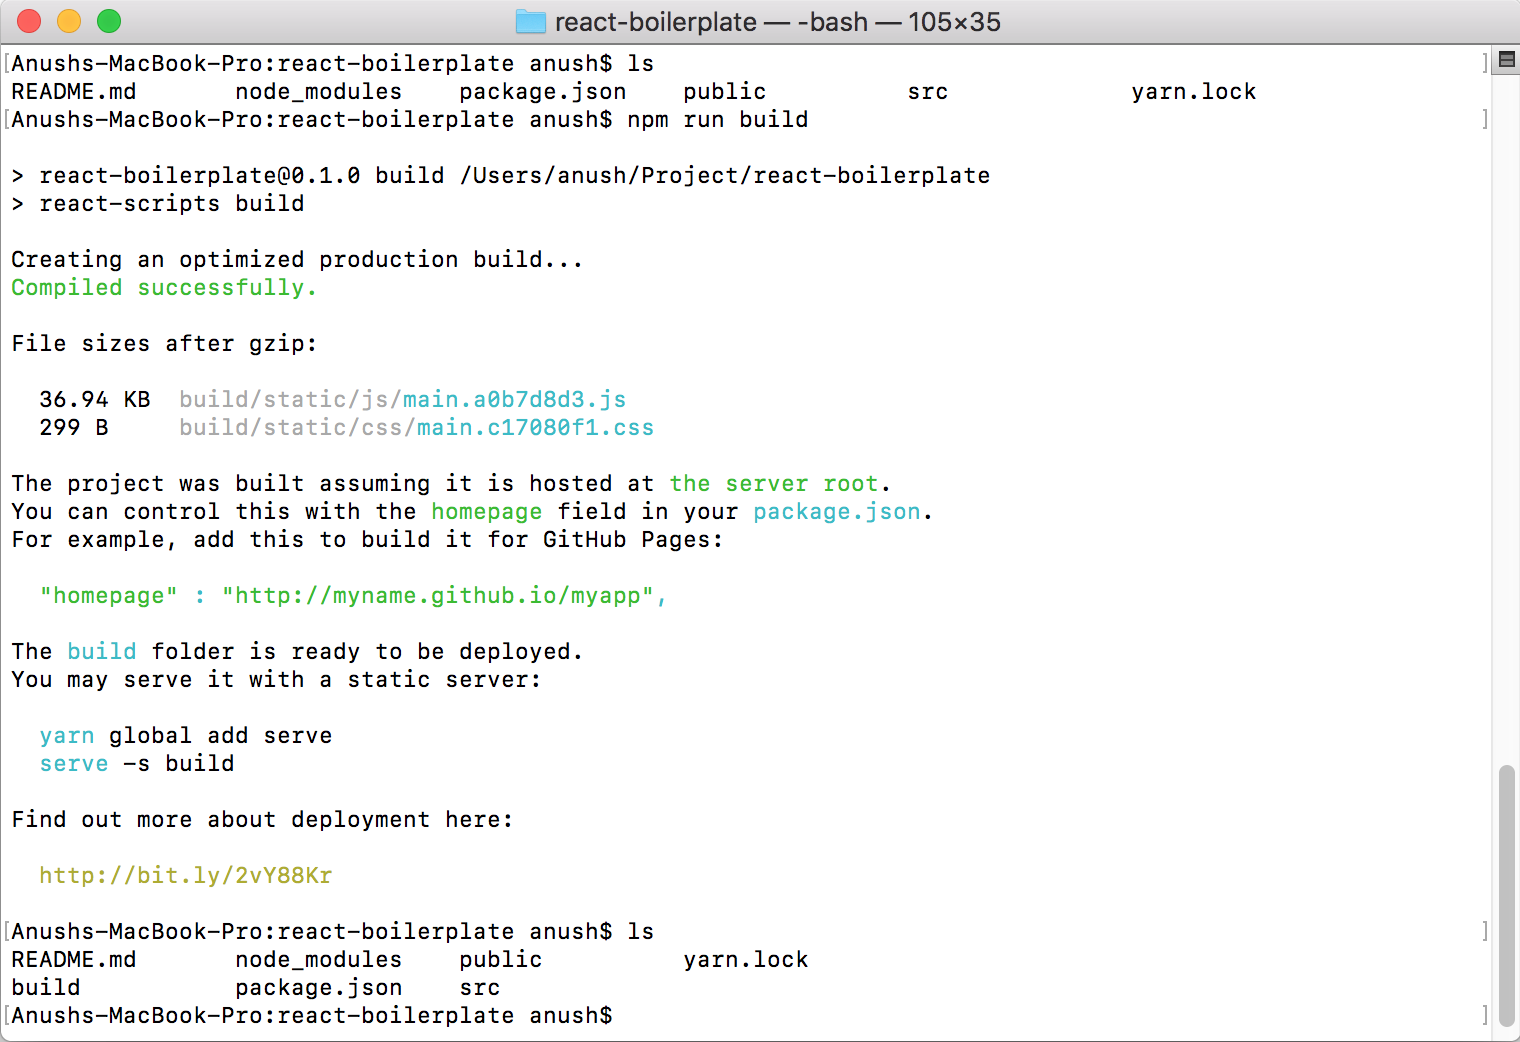
Once you transfer the content of build directory to server your application will be up and running.
Regarding the hosting service. You can use any web hosting service to host your project all you need is a web server that can serve HTML and included Javascript files.
Continuous Integration / Continuous Deployment (CI/CD)
If you choose to set up your deployment via CI/CD great you are moving along, it looks hard to setup but its gonna be a piece of cake later on.
If you are new I’ll explain what a Continuous integration is before we proceed further, Continuous Integration / Continuous Deployment (CI/CD) is a development practice where each contribution (commit) by a developer is verified by an automated build, automated tests and made ready for deployment in single clicks.
In this tutorial Gitlab Pipelines will be used for demonstration you can use any other CI/CD of your choice.
The basic tasks involved to deploy a react js app remains the same Test -> Build -> Deploy. I want to point out one observation you might have come across with the diagrams and documentations In CI/CD indicating the Test stage after the Build stage, thats totally correct and that how its done but in case of react application we have to perform the test with JSX code not the javascript code which we are left with after build stage. You can have functional testing even after build but we are not gonna do it here.
Configuration
In a CI/CD the entire process of testing and building is done on the CI/CD Server, the server needs to be configured with the required packages for your application, It can be done every time CI/CD server is run but it takes a lot of time and resource so its recommended to use docker image with all requirements build.
Docker
Docker is container service which helps create environment in container. You can find more on docker. I’ll publish the image and image repository, you can use the image directly but I’m not sure how long ill be able to keep it updated so it would be great to build an image for your project yourself.
We will use 2 docker images in the deployment
- React JS Testing and Building.
- Deploy / Transfer Build to AWS.
You can use a single image and install the packages in one but to keep them redundant and independent I’ll use 2 separate docker Image.
# Dockerfile for React JS Testing and Building.
FROM ubuntu:16.04

MAINTAINER Anush

# ---------------------------
# --- Install required tools
# ---------------------------
RUN apt-get update -y &&
	apt-get install -y
		curl
		git
		expect
		wget
		zip
		unzip

RUN apt-get clean

ENV NODEJS_VERSION=8.3.0
    PATH=$PATH:/opt/node/bin

# ---------------------------
# --- Installing Node
# ---------------------------
RUN curl -sL https://nodejs.org/dist/v${NODEJS_VERSION}/node-v${NODEJS_VERSION}-linux-x64.tar.gz | tar xz --strip-components=1
RUN rm -rf /var/lib/apt/lists/*
- Github Repository : https://github.com/anushbmx/react-js-docker
- Docker Hub Image : https://hub.docker.com/r/anushbmx/react-js-docker/
# Dockerfile for awscli.
FROM ubuntu:16.04

MAINTAINER Anush

RUN apt-get update &&
    apt-get upgrade -y

# ---------------------------
# --- Install required tools
# ---------------------------
RUN apt-get install -y --no-install-recommends
    zip
    unzip
    curl
    python-pip
    groff
    python-setuptools

RUN apt-get clean

# ---------------------------
# --- Installing awscli
# ---------------------------
RUN pip install -U pip
RUN pip install awscli
- Github Repository : https://github.com/anushbmx/aws-docker
- Docker Hub Image : https://hub.docker.com/r/anushbmx/aws-docker/
CI/CD configurations
Let’s configure the CI/CD to perform the deployment test, build and deploy it to AWS S3. This tutorial will use Gitlab for CI/CD you can use any other CI/CD service of your choice. The configurations will need some change though.
CI/CD Stages
In here we will be using a 4 stage process for testing and deployment.
- Test
- Build ( Compile React )
- Deploy to Staging
- Deploy to Production ( Manual trigger )
The Deployment process will be programmed to stop after completing the deployment onto the staging server and the deployment to production is done manually. This is done so that not every commit disrupts the production with a new change before further testings in staging to check for any possible errors before updating the production.
The files of each build ( second stage) is stored as artifacts so they can be used for redeployed again without having to rebuild and also for deployment to production in the 4th stage to maintain consistency.
Configuring CI/CD on gitlab is straight forward you need to include .gitlab-ci.yml file with all configurations for your CI/CD methods.
# .gitlab-ci.yml
# Docker Image location on hub.docker.com, its normally your-username/repo-name
image: anushbmx/react-js-docker
# pipeline will use this image unless specifed in the stage definition

# Define the stages
stages:
  - test
  - build
  - staging
  - production

# Define the process for each stage
test:
  stage: test
  script:
  - npm install
  - npm test

build:
  stage: build
  script:
    - npm install
    - npm run build
    - ls -la build
    - zip build.zip -r ./build
  artifacts:
    paths:
    - build.zip

deploy_staging:
  image: anushbmx/aws-docker
  stage: staging
  script:
    - unzip build.zip
    - cd build
    - ls -la
    - aws s3 cp ./ s3://$AWS_BUCKET_STAGING --recursive
  environment:
    name: staging
    url: $AWS_STAGING_URL
  only:
  - master
  # this stage will only be executed for master branch

deploy_production:
  image: anushbmx/aws-docker
  stage: production
  when: manual
  # stage needs manual triger to start.
  script:
    - unzip build.zip
    - cd build
    - aws s3 cp ./ s3://$AWS_BUCKET_PRODUCTION --recursive
  environment:
    name: production
    url: $AWS_PRODUCTION_URL
  only:
  - master
If you noticed in the gitlab CI/CD config file there are variable with $ in-front, these are session variables. These variables are to be passed on to the environment when its being executed, these have to be specified in Gitlab repository setting. Most of the are secrets or session dependent variables so be careful to whom you share these variable values with.
- AWS_ACCESS_KEY_ID: Your account Access Key
- AWS_SECRET_ACCESS_KEY : Account access secret
- AWS_REGION :Region of your S3 bucket
- AWS_BUCKET_STAGING :Staging Bucket Name
- AWS_STAGING_URL : Staging Bucket Public URL
- AWS_BUCKET_PRODUCTION: Production Bucket
- AWS_PRODUCTION_URL : Production Bucket Public URL
Here is the list of variables needed for using the above CI/CD Config, you have to specify its value in Gitlab Repository settings. I have explained where you can find the values for these variables below.
To configure session variables go to Settings -> CI/CD -> Variables .
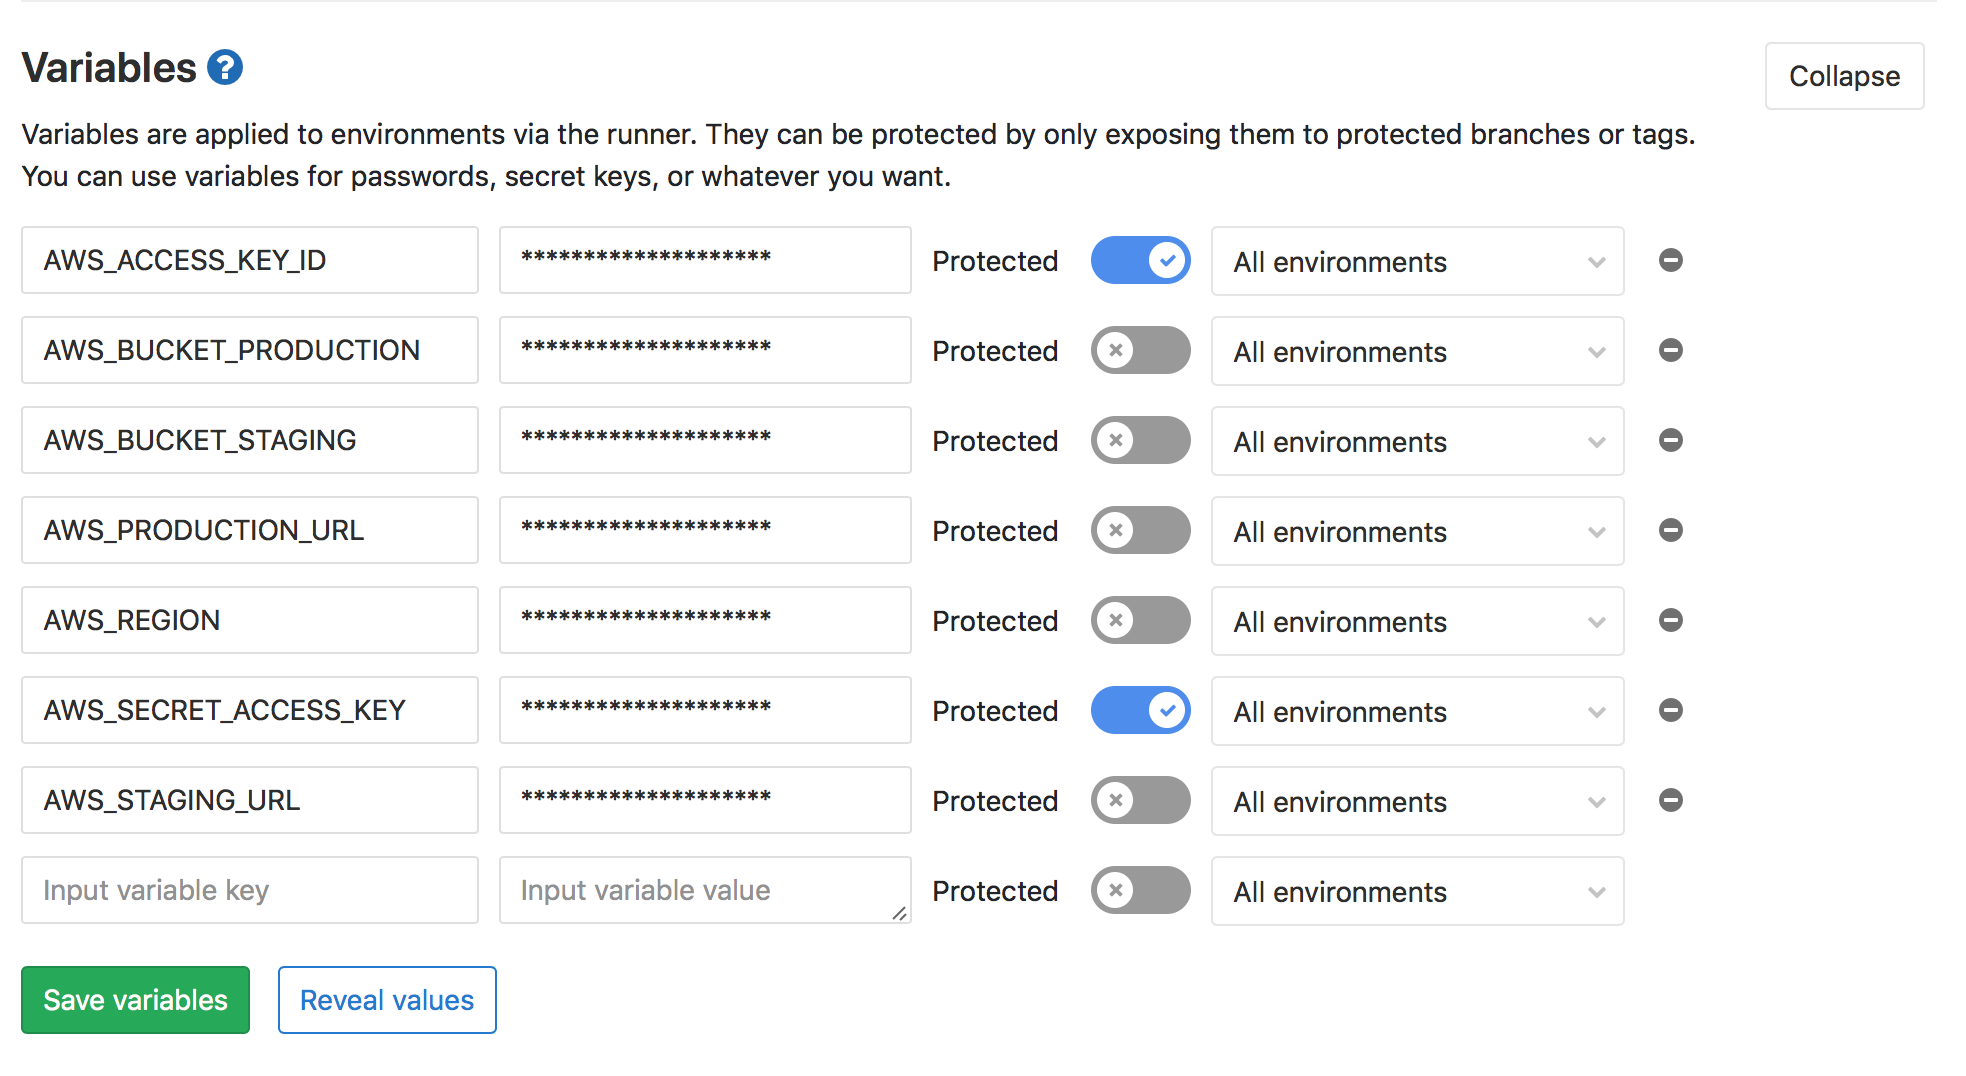
(Make sure to protect secret variable so they are shared only to protected branch.)
Configuring AWS S3
Let’s step and connect amazon web services to Gitlab to perform the seamless deployment.
- Create an Amazon Web Service S3 Bucker use the default settings (unless you know what you are doing) and choose region of your choice. You need to find the region code for the region you choose for your bucket from AWS Regions and Endpoints to fill the value for
AWS_REGION. - Enable static web hosting for the bucket.
Open Bucket Settings > Navigate to Properties Tab > Click on Static website hosting. - Check Use this bucket to host a website and Fill in index document as
index.htmland hit save.
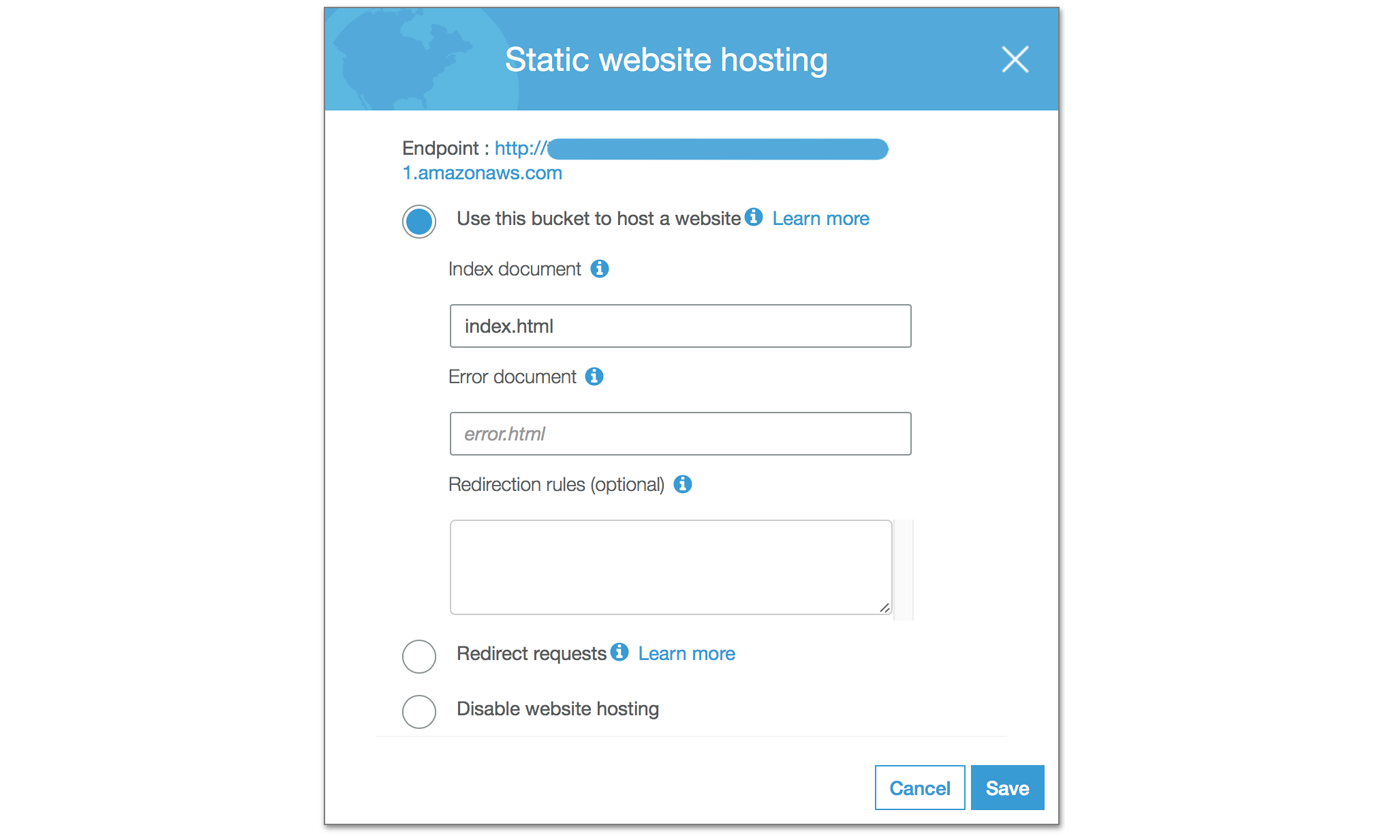
Make sure to note the Endpoint value this will beAWS_STAGING_URL or AWS_PRODUCTION_URLdepending on which bucket you are creating. - Now you need to set Permission for the bucket.
Navigate to Permissions Tab > Click on Bucket Policy. - Enter the follow permission.
{
    "Version": "2012-10-17",
    "Id": "Policy1503574560535",
    "Statement": [
        {
            "Sid": "Stmt1503574557617",
            "Effect": "Allow",
            "Principal": "*",
            "Action": "s3:GetObject",
            "Resource": "arn:aws:s3:::/*"
        }
    ]
}
Replace
You will be get a warning “This bucket has public access” thats expected. - Repeat the above steps to create one more bucket for production.
To get your AWS AWS_ACCESS_KEY_ID and
AWS_SECRET_ACCESS_KEY
- Navigate to Your Security Credentials (Top Navigation Bar ) you will be prompted with a popup asking to use AWS Identity and Access Management (IAM) users with limited permissions, Click on Get Started with IAM Users. If you didn’t see the popup click users from the sidebar.
- Click Add a user, fill in the user name and in Access Type check Programmatic access : access key ID and secret access key and move to next step.
- In permissions create a new group, give an appropriate name and choose AmazonS3FullAccess for the group.
- Review the permissions and ensure the user has Write access to AWS S3
Now any new commits pushed to the repository will trigger the CI/CD and each stage will be executed based on your settings.
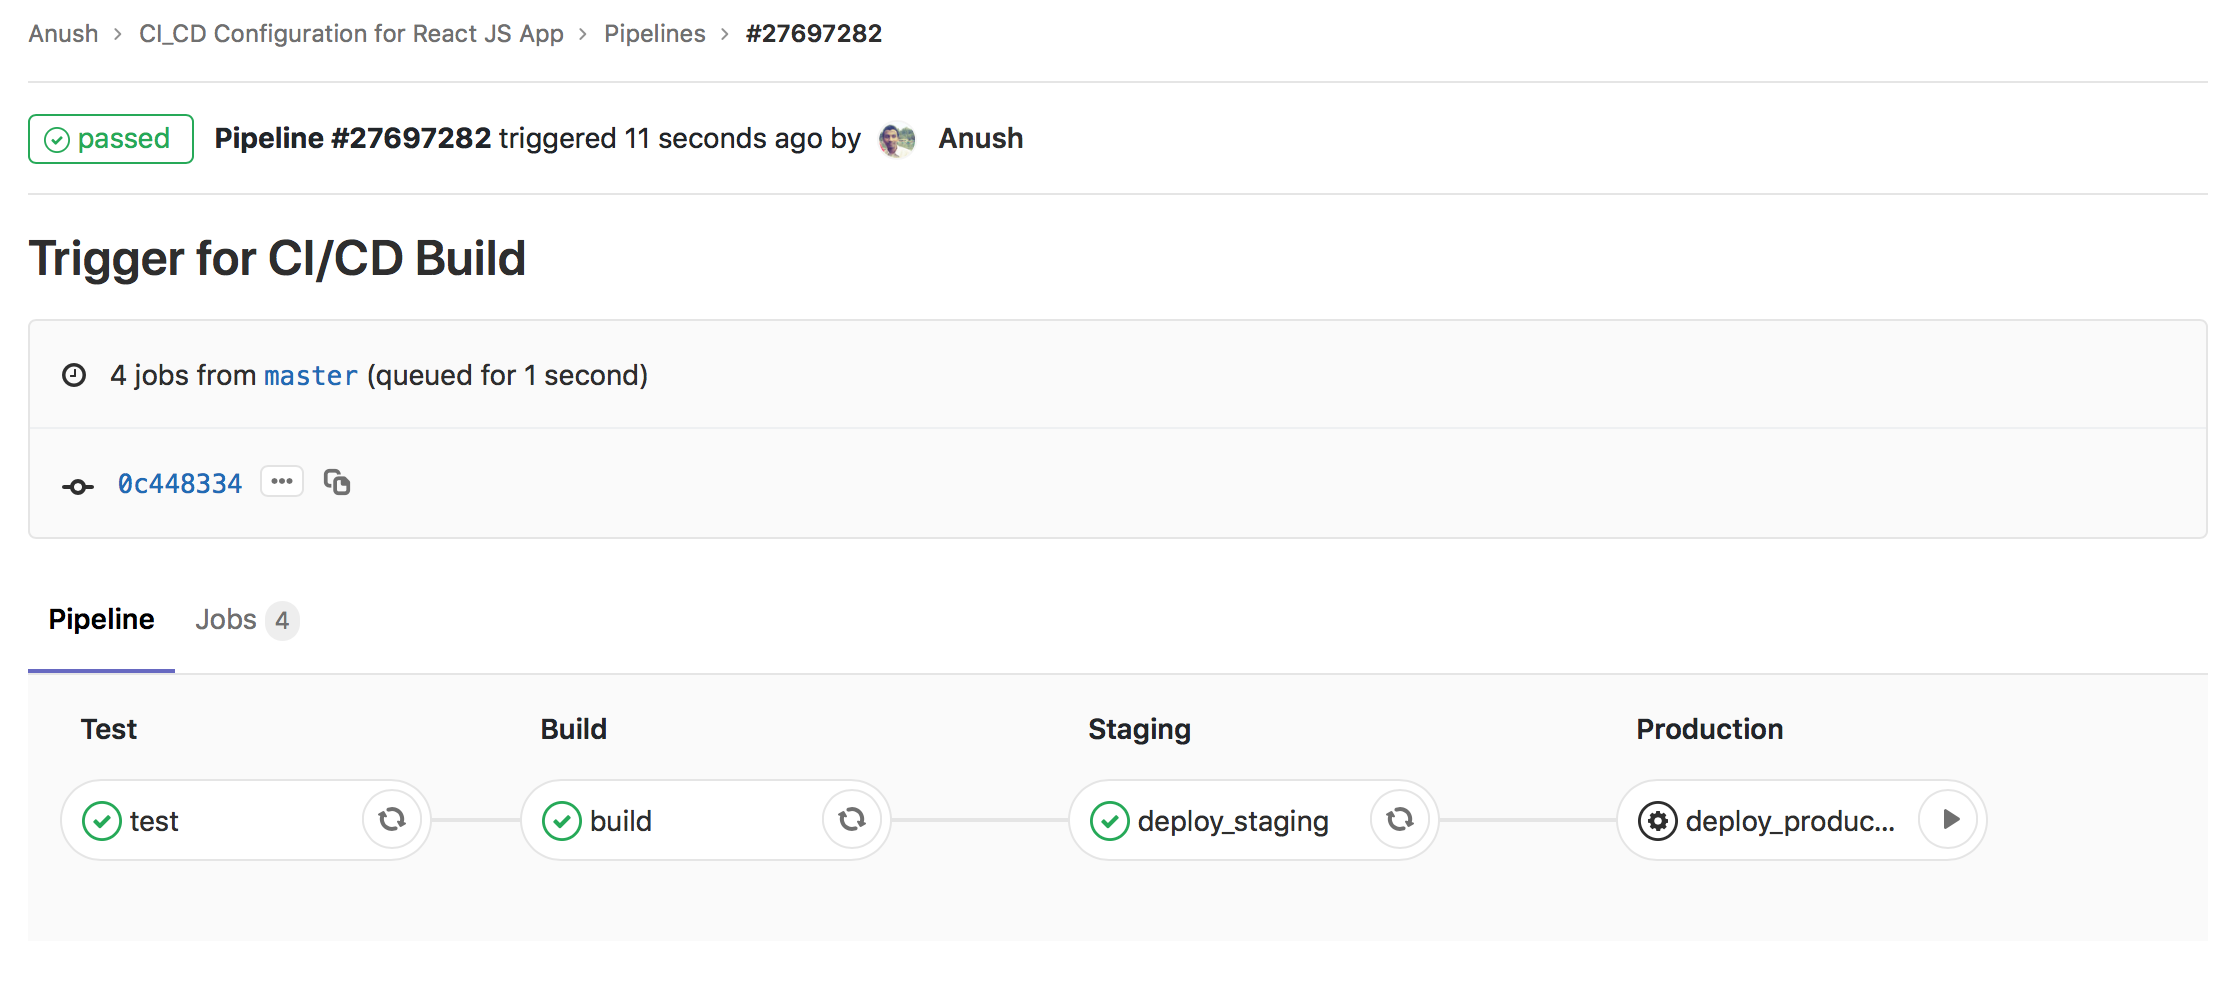
Each commit to master branch will proceed till the staging deployment. Pipeline https://gitlab.com/anushbmx/react-js-deployment/pipelines/27697282
Once you verify your application on the staging bucket you can start the deployment to production by triggering the play icon on the deploy_production stage. The same artifact will be used for deployment on staging and production, to get consistent and avoid any further errors.
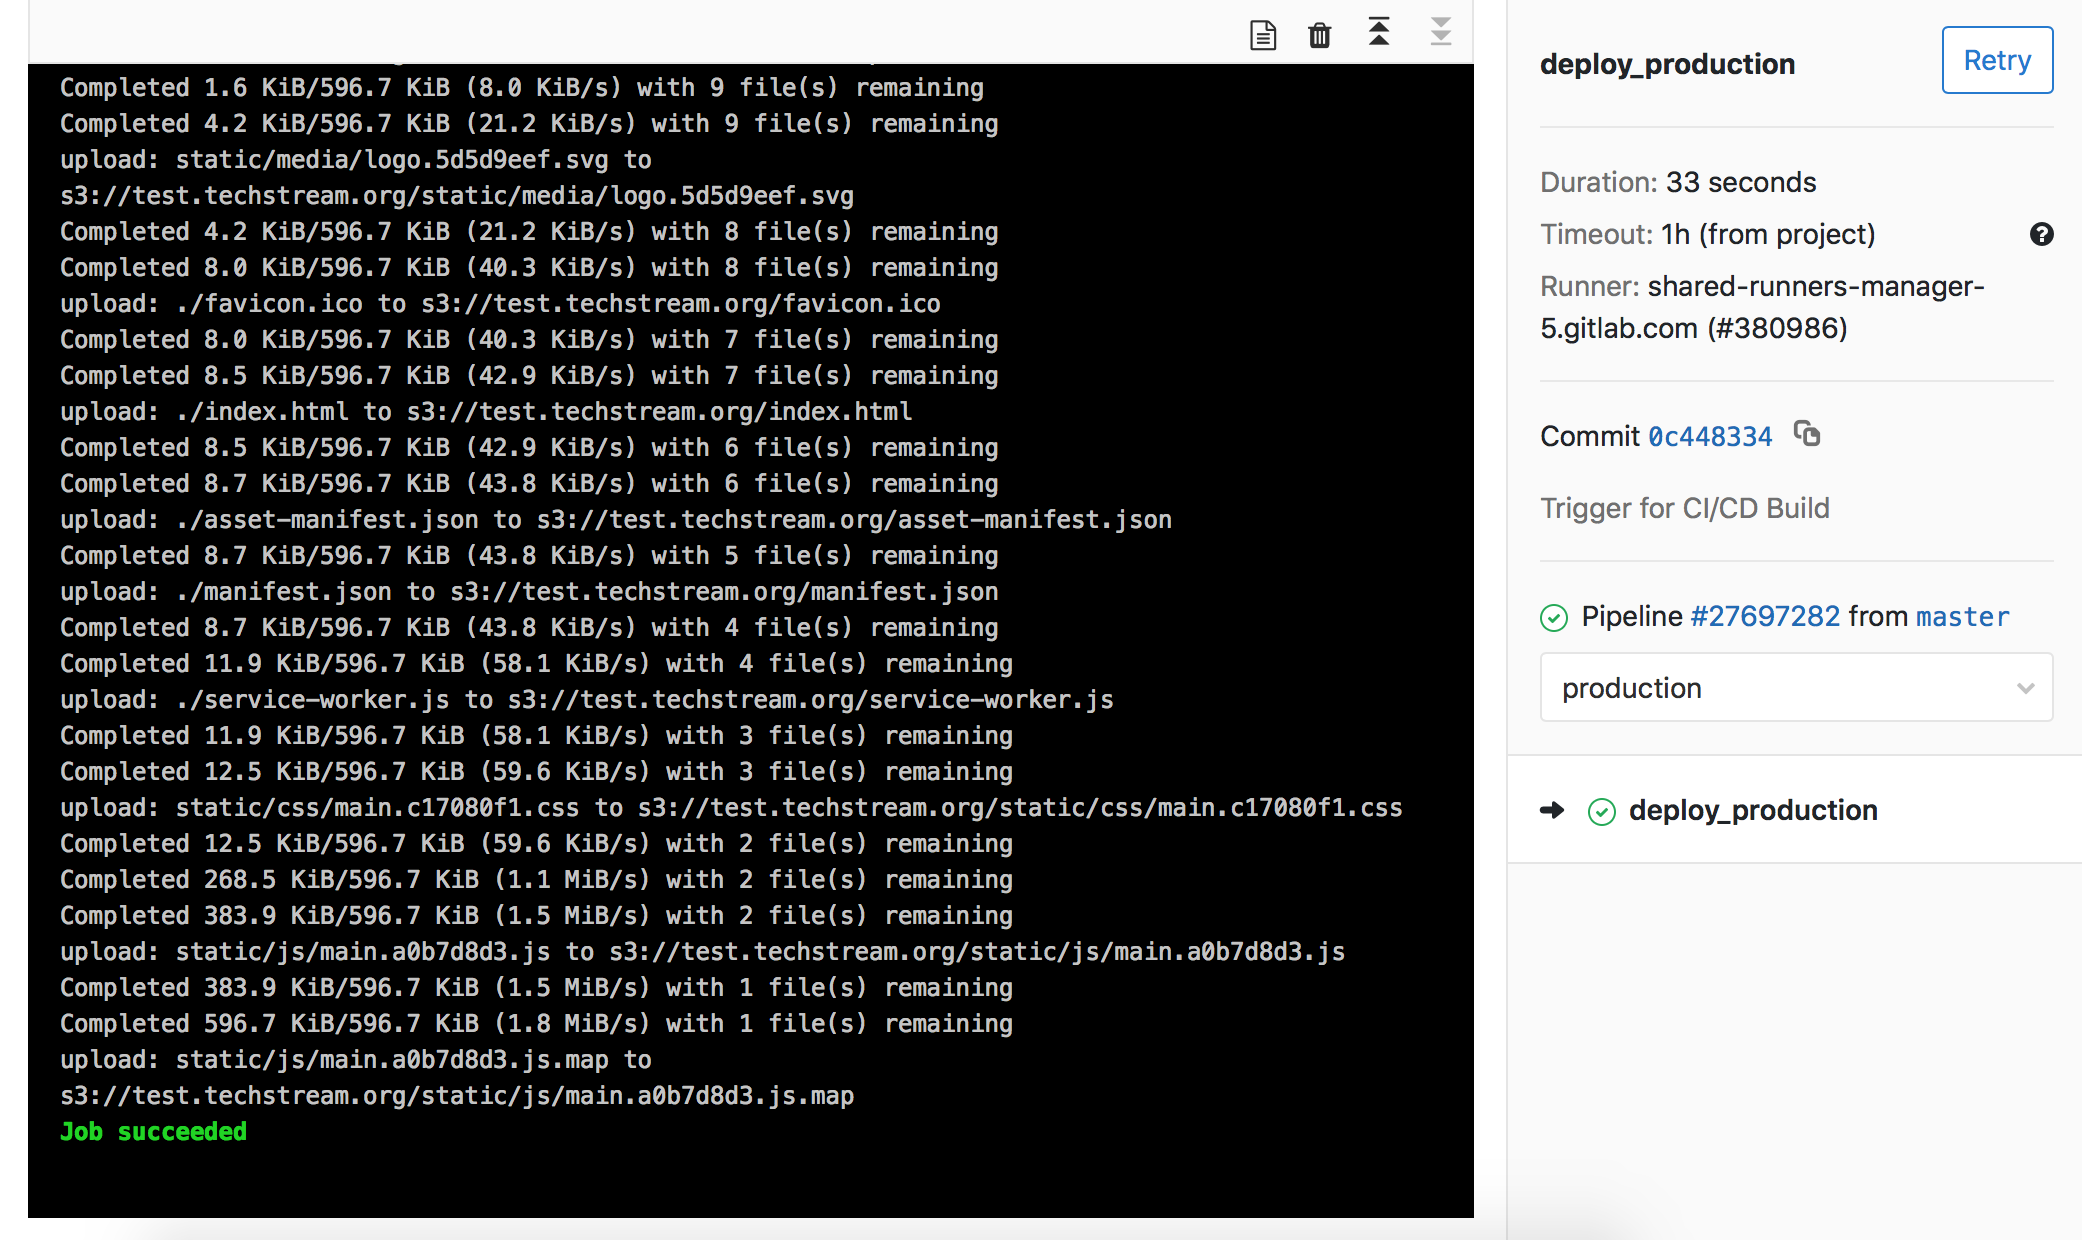
Gitlab repository for the Project : https://gitlab.com/anushbmx/react-js-deployment
Your application will be accessible on the AWS S3 public URL, you can replace It with your customer domain by setting “A Record” to the S3 URL or redirecting the traffic via Amazon Cloud Front.
Happy Deployment.

